Supplies Recovery
From FFXIclopedia, the free Final Fantasy XI encyclopedia
|
|
Enemies
| Monster | Level | Strengths | Weaknesses | Spawns |
Notes |
|---|---|---|---|---|---|
|
75-79 |
|
|
7+ |
A, T(S) | |
|
| |||||
Drops
|
|
|
|
Walkthrough
Collect more supplies than the 2 Immortals, Gasharyad and Salimuhl, who will be traveling with you.
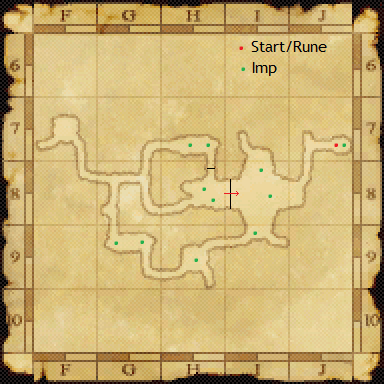
- You start at (J-7).
- Supplies are temporary items dropped from Imps.
- No Imps will appear anywhere on the map until one player talks to the NPC Kuihlud at the start.
- Because of this, it is useful to have people position themselves in key locations so that they can immediately begin killing Imps after they are popped.
- Supplies are collected in accordance with the following rules:
- An Immortal can stop you from getting supplies by performing an offensive action against an imp.
- The Immortal can get the supplies even if your party kills the Imp.
- An Immortal can stop you from getting supplies by performing an offensive action against an imp.
- Not all Imps drop supplies.
- When you obtain supplies, it is displayed in the chat log as you receiving a temporary item.
- The chat log will regularly display how many supplies have been collected by the Immortals, "The immortals have obtained <n> supplies so far."
- The mission ends when all Imps on the map have been defeated.
- If you have more supplies than the Immortals, you win.
- If you have less than or an equal number of supplies as the Immortals, you lose.
- The Rune of Release will appear next to Kuihlud back at the start point.
- Contrary to their name, the Immortals are in fact not immortal, and can be killed by the imps.
Notes
- The imps can pop in a variety of locations, but will typically be spread throughout the map.
- The Immortals have an advantage over players in this Assault: They are terrain-independent.
- A common strategy is to leave someone at the start to talk to the NPC, and have the rest of the party go to (H-8) the long way (via the long winding tunnel at the south of the map).
- Once in position, that person can talk to the NPC which pops the imps, and the group at (H-8) can immediately begin killing.
- While the person who is left behind cannot actually prevent the Immortals from getting supplies, it is still wise to get the majority of the party in position before starting the actual mission; this way the Immortals will at best be able to prevent the party getting supplies from one or two imps.
- If the group consists of 5 or more people, your initial positioning can involve 2 players at (H-8), 2 players at (H-9), and the initial person who pops the imps stay at the starting point. Then the two groups of 2 can work their way towards each other, effectively stopping the Immortals from both directions.
- It is a HUGE help to have a kiter for this assault. The kiter pops the imps, while the rest of the party splits into 2 imp kill units beforehand, as mentioned above. After popping the imps, the designated kiter then goes into the first large area (where the Immortals are), and immediately grabs hate on whichever imp(s) they are fighting (the Immortals will probably split up as to solo their own imps), proceeding to kite the imp(s) around. They should continue to do this until the 2 imp kill units are done killing their respective imps and have searched the map to make sure there are no unclaimed imps. After this is done, they are to assist the kiter (who is likely to be in need of assistance by this point any way) by killing the kited imp(s). Using this strategy is how my group of 6 won this assault (split into 2 imp kill units and one kiter/imp popper).
- Splitting into two groups failed because we simply could not stay alive long enough to earn enough packages. Instead we ended up moving as a 5 person team to H-7, popping the imps, and working our way backwards towards start. The 6th person, the one who popped the imps, would steal hate off the blue mages imps and kite them. If done correctly the blue mages should only have enough time to kill 3 imps (the ones at the start and two around I-8) before the player team clears out the remaining pops. You should not do this with less then 6 people, it's too much of a risk otherwise.
Strategy
See Strategies.
Ok I kited this as THF, we lost once and won once. I honestly believe it is easier to start at the beginning in the big room.(Most notes or strategies suggest going all the way to the end, then popping the imps) One Imp pops at the NPC and 2 more pop in the big room. They can kill the imps pretty easily when the only area you have to kite is the narrow passageway at the beginning. You can't kite in the big room until it is clear because kiting 3 imps would be near impossible. My strategy is to have your DD kill the 2 imps in the big room at the start and then move on from there while THF kites 3rd imp around the big room. I kited the 3rd imp in the big room for 5 mins and the immortals could barely get a hit on it because I never had to stop and turn around giving them time to cast on it and melee it. If you only have the narrow passageway at the beginning to kite they will inevitably kill the first 2 imps semi quickly and be on the 3rd imp by the time your melee are through killing all other imps leaving the entire assault up to luck of supply drops. 1st run they got 2 we got 2=loss. 2nd run we got 3 they got 2=win. (if their 3rd imp dropped supplies we would have lost again)
Map
| Assault | |
|---|---|
|
Leujaoam Missions: PSC | PFC | SP | LC | C | S | SM | CS | SL | FL |
Periqia Missions: PSC | PFC | SP | LC | C | S | SM | CS | SL | FL |
|
Assault Point Rewards: Amir Armor | Pahluwan Armor | Yigit Armor | Other | |


